Getting new hardware

December 27, 2014

It’s always a great start to a day when you know that new technology is on it’s way in the mail! Well, I recently had the pleasure of getting a few Playstation branded hardware arriving in the mail. Among them was a Playstation 4!

After having played around with it for a couple of days, it is indeed a pretty neat system. I’m loving the interface, and the new Share features are pretty awesome. The fact that it has a video editor inside is amazing! Thus, one morning I woke up and just felt like making a 3D model of the system for fun.

I fired up Blender 2.69 and started modelling away. By no means am I an artist, but after continuous practice I’ve sort of gotten the hang of how to use this nice piece of software.

I started off pretty slowly, but kept going.

Getting the materials on it, and still noticing there’s something off with the model. So, on I go.

After elongating the body and adding additional symbols, it’s actually starting to look like the real deal!

Just to add something additional to the scenery, I added a UV modeled box that somewhat resembles a TV.

Lastly, the generally final render is:

While not the best, it felt nice getting a model this close to something I have in real life in under an hour. It could certainly do with improvements, such as adding the ON light, adding the controller, and the cables at the back and making the material on the shiny part more reflective. However, I’ll leave that for another day when I’ve matured my basic blender skills further.


The American House

December 1, 2012

So, I’ve been doing my Unity project work for the entire day. Been testing my game executables on Windows 7, Ubuntu 12.10 and Mac OS X 10.7. With the release of Unity 4.0, I’ve been having a lot of fun seeing my measly game work on all these platforms with minimal effort on my behalf thus far.

Today, I decided to also make some better looking house models for my game. The one I currently have is really ugly and was basically used when I was figuring out how to properly import Blender models into Unity and ensuring the Mesh collider worked. Here’s what my first and rather fugly house looked like:

My initial house for my Unity project.

My initial house for my Unity project.

The texture’s aren’t self made. I don’t currently have the time to go taking photos with my camera around the neighbourhood for this. So, instead I grabbed textures or images suitable enough and compiled them into one image using GIMP 2.8.

After getting more used to how UV mapping works, and remembering all the Blender shortcuts, I was able to produce a more visually appealing house today. Note that I don’t give it too many shapes because my university’s lab computer’s only run on Intel graphics (which suck pretty bad).

This is what my new “American House” looks like. I call it American because it has a garage, and the main body is essentially built out of wood which seems to generalise what American (U.S.A) houses look like in general.

My house without textures, rendered.

My house without textures, rendered.

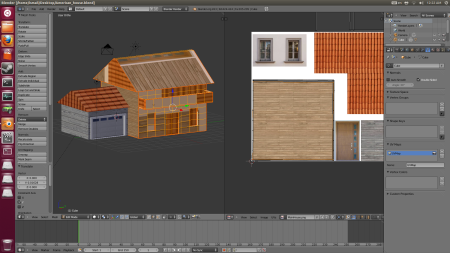
The process of adding UV textures.

The process of adding UV textures.

Finished applying the textures completely.

Finished applying the textures completely.

The textures were put into a 1920×1080 canvas in GIMP 2.8. With the larger image, it was possible to have better looking textures across my house model. I know it’s no masterpiece, but it is significantly more pleasing to my eyes and I’m sure to anyone else who would judge this. Now all I have left to do is bring it into my Unity project, and hope that the textures don’t go haywire like they do sometimes. Wish I had pictures of some of my other classmates projects, who take Games Programming 2 as well, since there are some really stunning models and animations they put into their Unity world. One guy even had an awesome mecha with full animation running around, but the world wasn’t proper yet.